Quick Reference
3Ways to Configure Windows Boot Menu:
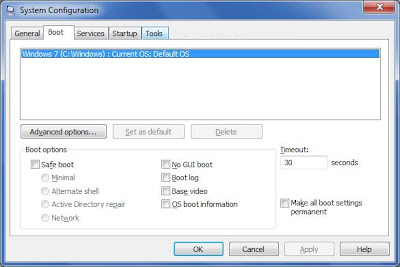
1. Msconfig (also configures some startup programs)
Click Start > Run (Windows 7, just type in the search area)
In the run window type msconfig
Click the 'boot' tab
Choose your settings then click okay
1. Msconfig (also configures some startup programs)
Click Start > Run (Windows 7, just type in the search area)
In the run window type msconfig
Click the 'boot' tab
Choose your settings then click okay

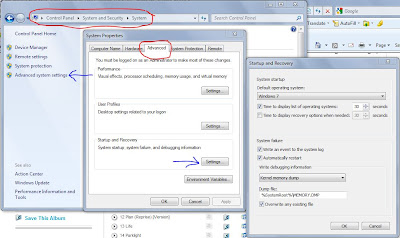
2. Startup and Recovery
Go to Control Panel > System > System Advanced Properties (System Properties, Advanced Tab)
Under 'Startup and Recovery', click the 'Settings' button. Configure Default OS and countdown delay here.
3. bcdedit
launch the cmd program as administrator by:
a. Go to Start > All Programs > Accessories, and Right Click 'Command Prompt' and allow all propmts you receive.
b. In windows 7 click start and search for cmd, then right click as in step a.
set logon screen timeout to 60 seconds:
bcdedit /timeout 60
show bootable entries:
bcdedit /enum all
show a short list of your entries:
bcdedit /v
find the entry you want and copy the identifier, looks like: {default} or {current} or {22a0fe01-802d-11df-b750-fd1087245f3d}.
Use is to set the default boot entry like this:
bcdedit /default {22a0fe01-802d-11df-b750-fd1087245f3d}
Delete and entry like this
bcdedit /delete {22a0fe01-802d-11df-b750-fd1087245f3d}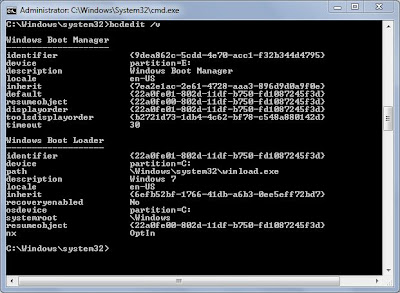

No comments:
Post a Comment